Visualizzazione post con etichetta crochet. Mostra tutti i post

domenica 15 maggio 2011

Pare sia...un viaggio fra il nuovo e l'antico!

Vi avevo già parlato poco tempo fa della bella iniziativa di Babi: aiutarla a creare una coperta composta dai nostri granny! I miei ve li ho già mostrati qui ma...c'è una novità! Come ringraziamento Babi mi ha mandato un fantastico regalo:

I've already told you about the beautiful initiative by Babi: helping her in creating a crochet blanked! You can see my grannies here and...there's something new that I want to tell you! Babi sent me a beautiful gift of thanks:


Come potete vedere è un preziosissimo centrino, fatto veramente ad arte e con molta pazienza!
Ancora mille grazie Babi!

As you can see it's a precious doily, beautifully and patiently made just for me! Many and many thanks Babi!


E dopo i dovuti ringraziamenti, vi voglio parlare di una interessante iniziativa del Ministero per i Beni e le Attività Culturali che ieri, 14 maggio, ha indetto la "Notte dei Musei". Per l'occasione gran parte dei musei italiani sono stati aperti anche in orario notturno, dalle 20.00 alle 02.00, con spettacoli e visite guidate gratuite!


And now I wold like to tell you about an interesting event promoted by the Ministery of cultural heritage and environmental conservation, the "Night of Museums". Yesterday, 14th May, many Italian museums were open from 8 pm till 2 am with shows and guided tours and the entrance was free!
Io ho partecipato a "...Fiat lux", un percorso tematico dicato all'illuminazione ai tempi dei romani presso il Museo Archeologico di Aquileia (UD). Al termine della visita, le bravissime guide hanno anche proposto ai partecipanti un laboratorio manuale nel quale poter realizzare delle lucerne in terracotta funzionanti con il metodo della matrice. Ecco il mio risultato:

I took part to "...Fiat lux", a guided tour in the Archeologic Museum of Aquileia (UD), which explained the way of illumination at the Roman time. At the end, the guides helped us to make a real Roman oil lamp. Here you can see mine:


Adesso devo aspettare 15 giorni perchè l'argilla si secchi e poi potrò cuocerla nel forno per ceramica! Non vedo l'ora sia finita!

Now I have to wait 15 days, till the caly is dry and then I can potter it! I'm looking forward to seeing it finished!

Luna

sabato 16 aprile 2011

Pare siano...granny, colori, emozioni

Anche se molto in ritardo voglio finalmente pubblicare le foto dei granny inviati a Babi per la sua bellissima iniziativa:

With some delay I finally post the photos of the grannis sent to Babi for her beautiful initiative:


Sapendo che il risultato finale sarebbe stata una coperta composta da tutte le piastrelle di noi partecipanti, mi sono sbizzarrita con i colori e le sfumature tentando di tenere una base comune in modo che anche lei riuscisse a riconoscerli. Eccoli qua:


As you will see, my grannies are very colourful and rich in tones but with common base; in that way it will be easier for Babi to recognize mine from all the other grannies. Did I tell you? The final result will be a wonderful bedspread which I'm looking forward to seeing!


Sono abbastanza soddisfatta di come sono venuti e vedere apprezzato così tanto il mio modesto lavoro mi rende ancora più felice. Grazie Babi! Spero di vedere presto la coperta finita! ^__^ Buona domenica a tutte!


I'm rather satisfied of the result and also Babi seems to appreciate them! Thank you for your kindness Babi! Have a nice week end!


Luna

domenica 6 febbraio 2011

Pare sia...un cuore crochet per voi!

Ho un piccolo regalo per voi: il cuoricino a crochet che avete visto sulla mia casetta di feltro!
Lo so, in internet se ne vedono davvero di tutti i tipi e di tutte le forme...ma siccome ne ho avuto richiesta e già pensavo di realizzare un pattern di questo tipo, ho deciso di darvi la mia versione del cuoricino sanvalentinesco.
Ovviamente si può utilizzare dove più vi piace: per decorare bigliettini, lavori di cucito, fermagli per cappelli e tutto quello che la fantasia vi suggerisce!
Spero vi piaccia!

Here it is a little gift for you: the crochet heart I sewed on my felted house!
I know, in internet there are thausands of theese pattern...but I want to give you my version too! You can use it wherever you like: to decorate cards, needleworks, hairclips and everything your imagination suggests you!
Hope you like it!

1 - Iniziare lavorando su un cerchio magico 9 p.bassi. Chiudere il giro con un p.bassissimo;
2 - 1 p.bassissimo, 1 p.basso, 1 p.basso + 3 p.alti + 1 p.basso tutti sullo stessa maglia, 1 p.bassissimo, 1 p.basso + 3 p.alti + 1 p.basso nella stessa maglia, 1 p.basso, e nelle successive 3 maglie 1 p.bassissimo fino a chiudere il giro (l'ultimo p.bassissimo andrà fatto sul primo p.bassissimo in modo da da dargli la forma a cuore);
3 - chiudere e rifinire il lavoro.


1 - 9 sc in a magic loop and join with sl st in first sc;
2 - 1 sl st, 1 sc, 1 sc + 3 dc + 1 sc in the same sc, 1 sl st, 1 sc + 3 dc + 1 sc in the same sc, 1 sc, and in the next 3 sts 1 sl st till the end (the last sl st is worked on the first sl st in order to make a heart);
3 - fasten off and weave in ends.

Luna

lunedì 31 gennaio 2011

Pare sia...voglia di casa!

Ormai è da quasi due mesi che la mia AmicaViaggiatrice è andata a convivere con il suo ragazzo e per festeggiare l'evento, le avevo regalato la coppia di strofinacci con bordura che vi avevo mostrato nel periodo natalizio.
Vi avevo anche già detto in
questo post che avrei voluto accompagnarli con una coppia di presine ma per ragioni di tempo e di indecisione (ci sono un sacco di pattern interessanti in giro!) avevo rimandato il tutto ad un secondo regalo.
Ed eccolo qui finalmente!

Two months ago my TravellerFriend was going to live together her boyfriend and in order to celebrate this event, I gave her the two tea towels with trims that I showed you in the Christmas' period.
I already told you in
this post that I would have like to make also a couple of potholders but for time and indecision reasons (there are lots of interesting patterns around!) I postponed everything untill a new gift.
And finally, here it is!

Due belle e grandi presine con fiorellini! Il patter se volete lo trovate nel blog di Flora; io alle mie ho apportato qualche piccola modifica (spero che l'autrice non se ne rammarichi!) come aggiungere un quadrato in più per renderle più sicure alla presa.

In più, ho intenzione di decorare il pacchetto che le conterrà con una piccola casetta in felto, mio primo esperimento di cucito (chiudete un occhio sui punti, ve ne prego...sono uno diverso dall'altro!!)

Two beautiful and big potholders with flowers! You can find the pattern in Flora's blog; mine have some changes (hope that the author will regret it!) such as an additional square to make them safe in the hand.

Then I'm going to decorate the gift-wrapped with a little felted house, my first sewing experiment (be gentle, don't look to the stitches...they are one different to the other!!)

"Casa è dove lasci il tuo cuore"
"Home is where the heart is"
Luna

lunedì 10 gennaio 2011

Pare sia...un pattern coniglioso!

Avete dovuto aspettare un po', ma come promesso ecco il pattern per realizzare il coniglietto Noel!
E' il mio primo pattern quindi se trovate delle incongruenze o degli errori, lasciatemi un messaggio e provvederò a correggere il tutto!

E ultimo ma non ultimo, siate gentili, se vi piace e lo utilizzate o lo pubblicate sul vostro blog, fatemelo sapere! Grazie!

Corpo e testa in un solo pezzo

Per iniziare avviate 6 p.bassi su un cerchio magico (magic loop);

1- 2 p.bassi su ogni p.basso (in totale avrete 12 punti)


2- *1 p.basso, 2 p.bassi nel p.basso seguente* ripetere da *a* fino a completere il giro (18)


3- *2 p.bassi, 2 p.bassi nel seguente p.basso*, ripetere da *a* fino a completare il giro (24)


4- *3 p.bassi, 2 p.bassi nel seguente p.basso*, ripetere da *a* fino a completare il giro (30)


5- *4 p.bassi, 2 p.bassi nel seguente p.basso*, ripetere da *a* fino a completare il giro (36)

6 a 10- 36 p.bassi

11- *4 p.bassi, 1 diminuzione* (1 dim = lavorare 2 p.bassi insieme), ripetere da *a* fino a completare il giro (30)


12- *3 p.bassi, 1 dim*, ripetere da *a* fino a completare il giro (24)

A questo punto potete ricamare la bocca e il naso del vostro piccolo amico e aggiungerci gli occhietti con chiusura di sicurezza (io non li avevo, quindi li ho semplicemente incollati alla fine -> mi raccomando però! Non fatelo se volete dare Noel a un bambino piccolo! Fate sempre attenzione alle piccole parti che potrebbero staccarsi!)


13- *2 p.bassi, 1 dim*, ripetere da *a* fino a completare il giro (18)


14- *1 p.bassi, 1 dim*, ripetere da *a* fino a completare il giro (12)

Imbottite la testa e iniziate a lavorare il corpo

15- *1 p.bassi, 2 p.bassi nel seguente p.basso*, ripetere da *a* fino a completare il giro (18)

16- *2 p.bassi, 2 p.bassi nel seguente p.basso*, ripetere da *a* fino a completare il giro (24)

17 e 18- 24 p.bassi

19- *2 p.bassi, 1 dim*, ripetere da *a* fino a completare il giro (18)

20- *1 p.bassi, 1 dim*, ripetere da *a* fino a completare il giro (12)

Imbottite il corpo

21- 1 dim in ogni p.basso fino ad avere 6 p.bassi. Chiudere e rifinire il lavoro.

Piedi

Su un anello magico lavorare 4 p.bassi

1- 2 p.bassi su ogni p.basso (in totale avrete 8 punti)

2- *1 p.basso, 2 p.bassi nel seguente p.basso*, ripetere da *a* fino a completare il giro (12)

3- 12 p.bassi

4- *1 p.basso, 1 dim* ripetere da *a* fino a completare il giro (8)

5 e 6- 8 p. bassi

Riempirla con un po' di imbottitura

7- 1 dim in ogni punto (4). Chiudere il lavoro lasciando il filo abbastanza lungo da permettervi di attaccare poi la zampina al corpo. Realizzare allo stesso modo anche la seconda zampa.

Mani e orecchie

Su un anello magico lavorate 4 p.bassi

1- 2 p.bassi su ogni p.basso (in totale avrete 8 punti)

2 e 3- 8 p.bassi

4- 1 dim in ogni punto (4). Chiudere il lavoro lasciando il filo abbastanza lungo da permettervi di attaccare poi la zampina al corpo. Farne altre tre uguali (due saranno le manine e le altre due le orecchie).

Assemblate il tutto e...voilà ecco pronto il vostro Noel!

Here it is the pattern of the little rabbit Noel! This is my first pattern so if you find some mistakes, just send me a message and I will correct it!

And last but not least, be gentle! If you use this pattern or you post it in your blog, please let me know! Thank you!

Head and body - one piece

6 sc in a magic loop

1- 2 sc in each sc around (12 sts)

2- *1 sc, 2 sc in next sc*, repeat from*to* (18)

3- *2 sc, 2 sc in next sc*, repeat from*to* (24)

4- *3 sc, 2 sc in next sc*, repeat from*to* (30)

5- *4 sc, 2 sc in next sc*, repeat from*to* (36)

6 to 10- 36 sc around

11- *4 sc, dec 1* (1 dec = 2 sc together), repeat from*to* (30)

12- *3 sc, dec 1*, repeat from*to* (24)

Now you can embroider the mouth and the nose of your little ami, and attach 2 little plastic eyes with safaty backings (in my case I just glued them at the end -> don't do this if you want to give Noel to a little kid! Pay attention to small parts!)

13- *2 sc, dec 1*, repeat from*to* (18)

14- *1 sc, dec 1*, repeat from*to* (12)

Stuff the head and start to crochet the body

15- *1 sc, 2 sc in next sc*, repeat from*to* (18)

16- *2 sc, 2 sc in next sc*, repeat from*to* (24)

17 and 18- 24 sc around

19- *2 sc, dec 1*, repeat from*to* (18)

20- *1 sc, dec 1*, repeat from*to* (12)

Stuff the body

21- 1 dec in every sc around (6) then finish off

Leg

Make two pieces

4 sc in a magic loop

1- 2 sc in each sc around (8 sts)

2- *1 sc, 2 sc in next sc*, repeat from*to* (12)

3- 12 sc around

4- *1 sc, dec 1*, repeat from*to* (8)

5 and 6- 8 sc around

Stuff a little

7- 1 dec in every sc around (4) then finish off living a long tail for sewing

Arm and ear

Make four pieces

4 sc in a magic loop1- 2 sc in each sc around (8 sts)

2 and 3- 8 sc around

4- 1 dec in every sc around (4) then finish off living a long tail for sewing

Finally attach legs, arms and ears to the body and...voilà here it is your Noel!

Luna

giovedì 30 dicembre 2010

Pare siano...pensieri di Natale

Il Natale è ormai passato e con esso anche quell'atmosfera di magia e attesa che tanto lo caratterizza...eh sì...dovremmo aspettare un altro anno prima di rivederlo!
Per tutti i nostalgici, ho deciso di pubblicare le foto di due mie creazioni che, spero, vi faranno sentire ancora per un po' il sapore del Natale.


Chi non sogna un bianco Natale? E allora eccolo qua, ricreato sull'ultimo dei miei bigliettini per augurare buone feste! E' un misto fra carta e cotone perchè l'ho impreziosito con un fiocco di neve più grande, lavorato all'uncinetto seguendo il pattern della Lion Brand Yarn. Infine ho aggiunto anche delle decorazioni con la carta trasparente e dei ghirigori disegnati a mano.


Bianco su bianco vi presento anche il coniglietto Noel, regalino per nostra cugina devo ammettere molto apprezzato! Pubblicherò il pattern nel prossimo post...aspettatelo!

Christmas is now gone and with it, also the magical and snowy atmosphere...oh yes...we have to wait another year before seeing it again!
For all the nostalgic people, today I'm going to post the photos of my creations which (I hope) will make you feel the Christmas taste once more!
For those who want a white Christmas, here it is my last greetings card! It's a mixture of paper and cotton because the big snowflake is worked by hook, following this pattern of Lion Brand Yarn. At the end I glued on it pieces of see-through paper and drew some squiggles.

White is the perfect colour and here it is the crochet rabbit Noel, a little present for our cousin.
If you want the pattern, just continue to follow our blog!

Ci vediamo il prossimo anno!
See you next Year!

Luna

giovedì 16 dicembre 2010

Pare sia...l'opera (in)completa!

Vi ricordate che nel post precedente vi avevo mostrato un inizio di lavoro all'uncinetto?
Finalmente posso mostrarvi che cos'è e a che cosa mi serve!


Come potete ben vedere, si tratta di una bordura e visto che gli strofinacci da nobilitare sono due, ne ho già completata un'altra che aspetta solo di essere cucita al suo posto!

Avrei voluto accompagnarli con una coppia di presine a crochet ma, ahimè, i tempi di consegna sono stretti e non penso riuscirò a completarle in tempo... manco a dirlo! Il Natale mi sembrava così lontano e invece è ormai alle porte!


Do you remeber my previous post where I showed you the beginning of a crochet work?
At last I can tell you what it is and where I want to use it!

As you can see, it's a trim and I've just completed another one too because I want to decorate two beautiful tea towels. The initial project was to add also a couple of potholders but the delivery is near and I don't think I will make them... that goes without saying! Christmas seemed so far to me and now it's almost here!

Luna

giovedì 9 dicembre 2010

Pare siano...prove tecniche di Natale!

Ci siamo...ormai mancano davvero pochi giorni a Natale e ovunque fervono i preparativi!
Anche le mie mani sono al lavoro e oggi vi mostro un'opera completa e una che invece sta procedendo di buona lena verso la conclusione:


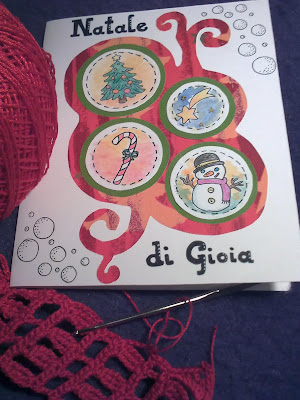
Eccolo qua, un semplice bigliettino d'auguri realizzato con un cartoncino bianco come base, una carta da regalo dalle sfumature rosse e oro, e piccoli cerchi al cui interno ho disegnato i simboli più classici di questo periodo: un albero di Natale, una stella cometa, un bastoncino di zucchero e un pupazzo di neve. La scritta "Natale di gioia" è fatta a mano con una penna a china e un tocco di acrilico bianco.

Quella che vedete in primo piano invece è l'opera a metà...vi svelo di cosa si tratta?
Mmh no...lasciamo un po' di suspense!

Vi mostro invece il nostro alberello di rami che giusto ieri abbiamo finito di addobbare:

E' posizionato vicino all'entrata di casa e la sua aria un po' trasandata ma festosa lo rende un perfetto invito ad entrare e godersi l'atmosfera natalizia dell'interno. Purtroppo però queste giornate piovose non sono molto d'aiuto per chi vuole fare delle foto al chiuso, così devo (ahimè) rinunciare a mostrarvi il nostro albero di Natale e le varie decorazioni sparse per casa...sarà per la prossima volta!


Here we are...Christmas is nearly here and everywhere you look, you could see decorations and ornaments!
My hands are also busy and today I would like to show you a completed work and another one that is going to be ready soon. The first one is a simple greetings card made with a white card, some red and gold wrapping paper and little drawing circles (a Christmas tree, the Star of Betlehem, a candy cane and a snowman). The writing "Chritsmas of joy" is handmade using ink and a touch of white acriclic.

The crochet thing in the foreground is my work-in-progress...should I tell you what it will be?
Mmh no...I will spring a surprise on you!

But I could show you our decorated tree made out from branches.
We put it just next to the house door and its shabby but merry look invites you to enter and enjoy the Christmas atmospher. Unfortunately the weak light of these rainy days is not ideal to take some photos of the indoor...so I have to postpone the imagines of our Christmas tree and of the other decorations.

Luna

lunedì 29 novembre 2010

Pare sia...un modo per dire grazie!

Separarsi da qualcosa che si è costruito con le proprie mani è sempre un po' difficile: dentro c'è una parte di noi stessi, quel pizzico di magia che non si può ritrovare in nessun altro oggetto.
Donare è bello, certo, ma quando la nostra creazione viaggia fino ad arrivare ad una persona che nemmeno conosciamo un po' di nostalgia ci prende, no?!


Così per ringraziare e contraccambiare il gesto di Patty Rain (vi ricordate? ho vinto il suo giveaway) ho realizzato questo piccolo gufetto a crochet:


Si chiama Leotordo (se qualcuno conosce il mondo di Harry Potter sicuramente si ricorderà che è lo stesso nome dell'incontenibile gufetto di Ron) e i suoi colori sono un po' natalizi cosicchè non stonerà nel periodo festivo che sta per arrivare. Sulla testa ha un nastrino con cui si può appende facilmente ovunque si voglia...anche sull'albero di Natale (e quale miglior posto per un volatile?).

Se anche voi volete un gufo per amico, potete seguire questo semplice pattern a cui mi sono ispirata apportando però qualche modifica.

It's always a little bit difficult to leave something that you created with your own hands: there's a part of you inside it, that magic that is impossible to find in another object.

Giving away is a beautiful thing, of course; but when our creation goes to someone who even we don't know, we feel a little nostalgic about it...

That's why I want to thank and return the gift of Patty Rain (do you remember? I won her giveaway!), crocheting this little owl.

His name is Leotordo (if someone knows the Harry Potter' saga will surely remember that is also the name of Ron's owl) and has Christmas colours so he will not look bad in this incoming holiday period. On his head there is a ribbon so he could easily be put up everywhre...even on the Christmas Tree (what a better place for a bird?).

If you want an owl for friend too, use this simple pattern that I followed as example but with some changes.

Luna

lunedì 22 novembre 2010

Pare sia...sbocciato un fiore!

Adoro l'uncinetto! E' uno dei miei strumenti di lavoro preferiti! Basta anche poca lana o qualche filo di cotone avanzato e riesci sempre a creare qualcosa di speciale! Infatti, a differenza dei ferri con cui sei costretta a lavorare principalmente solo su lavori grandi, con l'uncinetto ci si può veramente sbizzarrire: dalle "miniature" decorative (pizzi e bordure, elementi accessori...), a veri e propri progetti (maglioni, pupazzi, scialli...).

E allora ecco cosa è saltato fuori usando semplicemente un filato di cotone blu elettrico e un elastico...

E' un anellino molto semplice: un fiorellino a crochet cucito su una striscia di punti bassi. Per fare in modo che l'anello possa essere portato su qualunque dito, ho unito le due estremità della fascia con un piccolo pezzo di elastico.

I love crocheting! That's one of my favourite techniques! All you need is a little bit of wool or some cotton threads and you will be able to make something special! When knitting, you have to work mainly on big projects but with hook you are free to create decorative "miniatures" (laces and trims, little accessories...) or even big patterns (sweaters, puppets, shawls...).

And that's what I made using only an elettric blue cotton and an elastic band.

It's a very simple ring: a little crochet flower sewn on a band of single crochet. So that it could be worn on every fingers, I join the ends with a little elastic band.

Luna